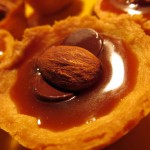
Caramel, Nut, and Dark Chocolate Tartlets
These tartlets were really quite simple to make. All it takes is a basic shortbread crust, mini muffin tins, some good quality caramel sauce, dark chocolate, and nuts. You want to make sure that you have all of your ingredients ready before you bake the crusts.
Shortbread Crust
makes about 24 mini tart shells
1 cup unbleached all purpose flour
1/3 cup powdered sugar
1/8 teaspoon salt
1/2 cup cold butter, cut into 1/4-inch cubes
Place the flour, sugar, and salt in a food processor. Pulse briefly to blend. Add the butter and pulse until the dough begins to to come together. You don’t want to overmix this dough, but make sure all ingredients are evenly distributed.
Depending on your tastes, if you are using unsalted butter, you can increase the salt to 1/4 teaspoon.
Turn the dough out of the food processor bowl onto a large piece of plastic wrap. If necessary, knead every so slightly to incorporate any unmixed flour. Let the dough rest.
Prepare mini muffin tins. This dough has a lot of butter in it, so you’ll only need to spray or “grease” them if they’re not non-stick.
Pull off small pieces of dough (the size of a non-shelled almond) and press them into the mini-muffin tins. You’ll want the dough to be fairly thin at this stage. When you’ve filled the pan, then dock the bottom of the shells with a fork 2-3 times. This will prevent the shells from puffing up while they bake. Place the pans in the freezer and chill for at least 20 minutes. This will also prevent the dough from sliding down into the bottom of the pan while they bake. Use this time to assemble the other ingredients: nuts, chocolate, caramel.
You can prepare these ahead of time and keep the shaped dough in the freezer. If you’re going to freeze the shells for more than 1 hour, you’ll want to wrap them well.
When you are ready to bake them, preheat your oven to 425 degrees. Keep the shells in the freezer until you are ready to bake them. Bake in the center of a preheated oven for about 13-15 minutes, rotating once if necessary. Watch your time carefully. These shells go from not done to too well done very quickly.
While the tarts are chilling in the freezer, lightly toast your nuts of choice. You can use almonds, pecans, macadamias, walnuts, or any nut you’d like to try. I used almonds, pecans, and walnuts because that is what I had on hand. These would be fantastic with macadamia nuts.
Nuts can be toasted in the oven while it is preheating. Just be careful because at this temperature, the nuts will toast very quickly and there is very little time between perfect and burnt. When done, remove from the oven and cool. Save 24 whole nuts for garnish, and chop the rest into small pieces, but not too fine, maybe about 1/8 inch chunks.
Somewhere I have a fantastic recipe for homemade caramel, but it makes a huge amount and you really only need a few ounces for this recipe. For the caramel sauce, I used Trader Jacques’ Fleur de Sel Caramel Sauce. It was fantastic. You want to pick a caramel sauce that is fairly firm when at room temperature. A thin caramel sauce won’t give you the chewy bite you’ll want in these tarts.
For the chocolate, I used Ghirardelli 60% dark chocolate chips. I think next time I’ll make a ganache because the chocolate bloomed a little after it cooled and the tarts did not turn out as pretty as I had hoped. They were still quite delicious, though!
When you have all of your ingredients assembled and ready to go (i.e., mis en place*), then place the shells in the oven to bake. While they are baking, heat up the caramel sauce so that it will be easy to pour into the shells. When you pull the shells out of the oven, you will want to fill them immediately.
To assemble the tarts:
If using chocolate chips, then place 1-2 chocolate chips in the bottom of the shell as soon as it comes out of the oven. Place a few pieces of chopped nuts, then pour in the caramel. Top with another 2-3 chocolate chips and allow to melt slightly. Then press a whole nut on top for garnish. Press it in slightly. Allow the tarts to cool.
If using ganache, you can allow the shells to cool. Place a few pieces of chopped nuts into the shell, pour in the hot caramel. Cool. Prepare the ganache (it can be as simple as 1 part heavy cream to 2 parts dark chocolate – heat the cream to just below boiling, remove from heat, and stir in the chopped chocolate and stir until smooth).
When the caramel has cooled completely, carefully spoon a little ganache on top of the tart, then place a whole nut on top.
Voila! You have tartlets!
We paired these with a Mendelson late harvest pinot gris (http://www.mendelsonwines.com/index.php/wines/pinot-gris-1.html).

The blackberry mascarpone tart recipe will have to wait another day …
These we paired with a Mendelson late harvest muscat canelli (http://www.mendelsonwines.com/index.php/wines/muscat.html)


Now that was a little piece of heaven on earth!
* Mis en place means to put everything in its place.

 Follow


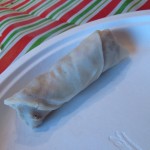


 Serve these with an assortment of sauces, such as Sweet Thai Chili Sauce, Hoisin Sauce, Plum Sauce, or whatever sauce will pair nicely with the filling.


")
")


")


")
")
")
")


")
